|
|
 |
|
drain & remove gearbox 1 remove expansion chamber 4 nuts and carefully prise out rubber/brass pipe feed from cyl 2 remove gearbox drain oil - remove the big nut under the propflange, alternately lift the whole unit into a sump tray after undoing bottom bolts, so when parted the oil is contained use a lump hammer/ pair of big srewdrivers, some stone chisels etc to prize the gearbox backwards, use rag underneath joint to collect drips
3 remove cylinder, and piston
carefully detach the gasket from one complete side using feeler blades to preserve it as it is often good enough to reuse.
remove the piston for safe keeping - first scratching an arrow foreward, then drifting back/foreward the piston pin with a 1/4" drive extension, which you will find fits neatly inside the hollow end of the pin - so drift it out toward the closed end, by holding the piston in your palm, and gently tapping the extension with a light hammer - this way you cant possibly damage the con-rod, or the piston. Note my hand would be cupping the piston but has to take a photo 4 remove pulley, cover, magneto using impact driver/large screwdriver, tap long end with hammer to loosen, and remove. you may wish to paint/mark the alignement of the boss/pulley to TDC (remove spark pug and use rod onto piston crown to find
TDC) using 24mm ring spanner/adjustable/socket, tap loose and unscrew flywheel nut. if you find it too tight, prise out crank's woodruff key and keep it safe. use Vire flywheel/flange removal tool if you have one (with the boss allen bolts) or Magneto removal remove the 3 slotted bolts with a screwdriver, marking the alignement/ timinng with paint/scratch first.
unwind the HT cap from the HT lead, and pull the magneto with HT intact away from the crankcase - allowing the HT to slip through the rubber grommet 5 split crankcase & remove front section there are 6 bolts on the magneto side (6mm allen) remove them with a spanner on the short leg. part the front casing away from the crank carefully by loosening with lump hammer, then evenly wedging
screwdrivers etc between the gaps in the engine mountings, after some gentl prising and wiggling it will pull the
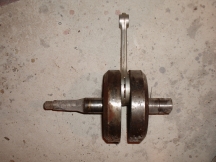
crank out of its front bearing dont be tempted to bash the crank end, as this will ruin the threads neccesary to be able to change points during onboard-servicing later. 6 drift out crank now you can drift out the crank from the rear housing/bearing with great care as follows. reassemble the front casing onto the crank and using a workmate, wood or whatever - support the casing so the crank-front can move downward, but the casing cant. Using a piece of hardwood as protection - beat down the crank till it touches the front casing (the hardwood washer protects the dog-end from burring over) (having already removed the front casing/bearing, use that as a support with additional 70mm wooden blocks on top, then refit the rear houning with embedded crank to rest on the blocks. This will allow you to drift down the crank 70mm, thus releasing it from the bearing.) then remove the front casings bearing and oil seal together by drifting it out with a socke(30mm) that fits onto the inner race and a lump hammer. Do the same for the rear housing oil seal and bearing.
if you are unlucky and the bearing came out of the housing instead of the crank, it is stuck/rusted on the crank, here is how to remove it: remove the rear main bearing by symetrically prising it off with a pair of bolsters/ large screwdrivers etc, gradually inserting spanner heads under the wedges until the bearing is off. alternately use a puller - but it might be difficult to find one that will grab under the bearings skirt initially anyway! If its completely rusted, i suggest grind off the outer race, ball race, and grind a ledge into the outside of the inner race (thus not damaging the crank in any way). Note: You cannot strip the big end as it is pressed together in the Finnish factory with 20-40 tonnes
|
| [Vire 7 Marine Engine] [How To] [Manuals] [FAQ] [Special Deals] [Contact] [Buy Parts] [Vire 12] |
