|
|
||||
drain & remove gearbox 1 remove the water pipe from the cyliner with large ring spanner/socket (22mm brass) remove the water pipe from the water pump to prevent damage (17mm pipe nut) 2 remove gearbox drain oil - remove the big nut under the propflange, alternately lift the whole unit into a sump tray after undoing bottom bolts, so when parted the oil is contained use a big srewdriver, some stone chisels etc to prize the gearbox backwards and off its dowels
remove the dipstick
3 remove cylinder, and piston
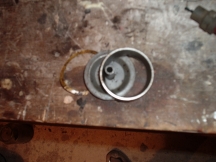
carefully detach the gasket from one complete side using feeler blades to preserve it as it is often good enough to reuse. slip off the clinder remove the piston for safe keeping - first scratching an arrow foreward, then drifting back/foreward the piston pin with a 1/4" drive extension, which you will find fits neatly inside the hollow end of the pin - so drift it out toward the closed end, by holding the piston in your palm, and gently tapping the extension with a light hammer - this way you cant possibly damage the con-rod, or the piston. 4 remove pulley, cover, magneto using 6mm allen key, tap long end with hammer to loosen, and remove. you may wish to paint/mark the alignement of the boss/pulley to TDC (remove spark pug and use rod onto piston crown to find TDC)
using 24mm ring spanner/adjustable/socket, tap loose and unscrew flywheel nut. if you find it too tight, remove flywheel cover/housing by 4 10mm bolts, take care with the gasket prise out crank's woodruff key and keep it safe. use Vire flywheel/flange removal tool if you have one (with the boss allen bolts) Magneto removal remove the 3 slotted bolts with a screwdriver, marking the alignement/ timinng with paint/scratch first. using thin pliers, detatch the LT wire from the points, reattach the nut for safe keeping unwind the HT cap from the HT lead, and pull the magneto with HT intact away from the crankcase - allowing the HT to slip through the rubber grommet 5 split crankcase & remove front section there are 6 bolts on the magneto side (14mm) remove them with a socket and extension.
6 remove rear crank bearing circlip and drift out crank remove the large-obvious circlip using pliers with screwdrivers - careful it doesnt ping off into your face next using two pairs of long nosed pliers and some tapping tools pull out the castelated spacer Now remove the crank seak with a medium screwdriver or 2, by levering within the dog/slot of the crank end
now you can drift out the crank with great care as follows.. first remove the fronf casings bearing by drifting it out with a socket that fits onto the inner race and a lump hammer. also pry out the oil seal using screwdrivers reassemble the front casing onto the crank and using a workmate, wood or whatever - support the casing so the crank-front can move downward, but the casing cant. Using a piece of hardwood as protection - beat down the crank till it touches the front casing (the hardwood washer protects the dog-end from burring over)
remove the rear main bearing by symetrically prising it off with a pair of bolsters/ large screwdrivers etc, gradually inserting spanner heads under the wedges until the bearing is off. alternately use a puller - but it might be difficult to find one that will grab under the bearings skirt initially anyway!
If its completely rusted, i suggest grind off the outer race, ball race, and grind a ledge into the outside of the inner race (thus not damaging the crank in any way). Note: You cannot strip the big end as it is pressed together in the Finnish factory with 20-40 tonnes
|

 first pulling with pliers, remove the output shaft's taper bearing rim - which
will be still pushed into the rear crankcase, after a few pulls and taps - back - in it will slide out with it's dish and shim/s behind - keep these safely stored.
first pulling with pliers, remove the output shaft's taper bearing rim - which
will be still pushed into the rear crankcase, after a few pulls and taps - back - in it will slide out with it's dish and shim/s behind - keep these safely stored. next, loosen the front two cylinder nust using a tight fitting and open ended
spanner (1/2", 12mm or 13mm?) to avoid rounding them off. the rear nut is a bit bigger (15mm?)
next, loosen the front two cylinder nust using a tight fitting and open ended
spanner (1/2", 12mm or 13mm?) to avoid rounding them off. the rear nut is a bit bigger (15mm?)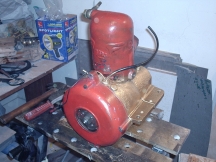 loosen all 3 nuts a couple of turns, and break the seal using a lump hammer to
loosen the cylinder.
loosen all 3 nuts a couple of turns, and break the seal using a lump hammer to
loosen the cylinder.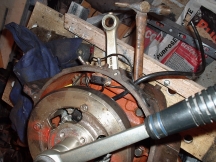 you can lock the crank up by jamming a wooden hammer shaft imbetween the flat of the crank, and the crankcase - thru the cylinder orifice. whatever you do, dont touch the small end
  or
alternately a three leg puller with a lot of care and ocassional whacks with a lump hammer onto the end.
or
alternately a three leg puller with a lot of care and ocassional whacks with a lump hammer onto the end. part the front casing away from the crank carefully by evenly wedging between the gaps in the engine mountings, after some gentl prising and wiggling it will pull the crank out of its front
bearing dont be tempted to bash the crank end, as this will ruin the threads neccesary to be able to change points during onboard-servicing later.
part the front casing away from the crank carefully by evenly wedging between the gaps in the engine mountings, after some gentl prising and wiggling it will pull the crank out of its front
bearing dont be tempted to bash the crank end, as this will ruin the threads neccesary to be able to change points during onboard-servicing later.
 under the seal is a circlip - remove it or you will never get the crank out properly!
 now remove the fron casing and driver the remaining crank out (should now be loose)
 with a heavy hammer/chisel you should be able to drift into the ledge to make the race spin on the crank, then add penetrating fluid, and the rest is easy.

| [Vire BVR Marine Engine] [How To] [Manuals] [FAQ] [Offers] [Contact] [Buy Parts] |